Having recently been introduced to the Elastic, Logstash, Kibana (ELK) stack by a colleague and having wanted to build a home-brew weather station for some time, I decided to combine both projects. There was surprisingly little information available online about building an arduino weather station and although it had been done, everyone seems to have their own take, and hardware requirements. Two sites provided useful information for this project:
- The manufacturer’s wiki of the weather station components and;
- This blog entry, written by a staff member at Elastic.co.
As a side note, once I figured out how to use ELK Stack and setup my data types, I also integrated information from a Fronius Inverter too. The inverter has a well documented API that outputs its data in JSON format. I used logstash to periodically pull the data from the inverter and output it into Elasticsearch. My Arduino is setup in a similar way to the Inverter: It hosts a simple website that only displays the current weather data in a JSON format.
Things you will need:
- An ELK stack. Elastic co provide significant documentation on setting up Elastic stack, so for the sake of simplicity I wont be covering this here.
- A weather station with anemometer from dfrobot or a supplier, I bought my equipment from littlebird electronics.
- An Arduino with an Ethernet shield, or an Freetronics Etherten.
- A passive PoE adaptor to supply power to your Arduino.
- The latest version of the Arduino IDE, and the Time library added into your Arduino environment. I prefer to do my coding in Microsoft Visual Studio Code which has plugin support for Arduino.
- Cat6 cable, telephone cabling (with RJ11 headers), some M->F breadboard cabling, waterproofed project box, appropriate mast that can support the weather station if needed.
- Access to my source code on Github.
Building and Programming the Hardware:
In my case, I opted to build a new, more stable mast, entirely separate from my TV antenna mast. Bunnings was able to provide the mast equipment I needed. As you may notice, I have also mounted a Ubiquiti Rocket M5 with a 120 degree antenna (nothing to do with this project!).

New Mast
Unfortunately the serial cables provided in the weather station kit were not long enough to do anything useful, so I had to buy two RJ11 joiners, RJ11 headers and cabling to extend the cabling to the eves where I mounted the electronics.

Roofing cabling

Project box mounted under the eves
It ended up being quite a task running the cabling to the eves, but it was worth it in the end! As I wanted to mount the sensors outside, I opted to go with a power-over-ethernet (PoE) system which required a Cat6 cable and passive PoE injectors. The weather station sensors on the roof are connected to the weather station circuit board via the two RJ11 cables Pictured below:
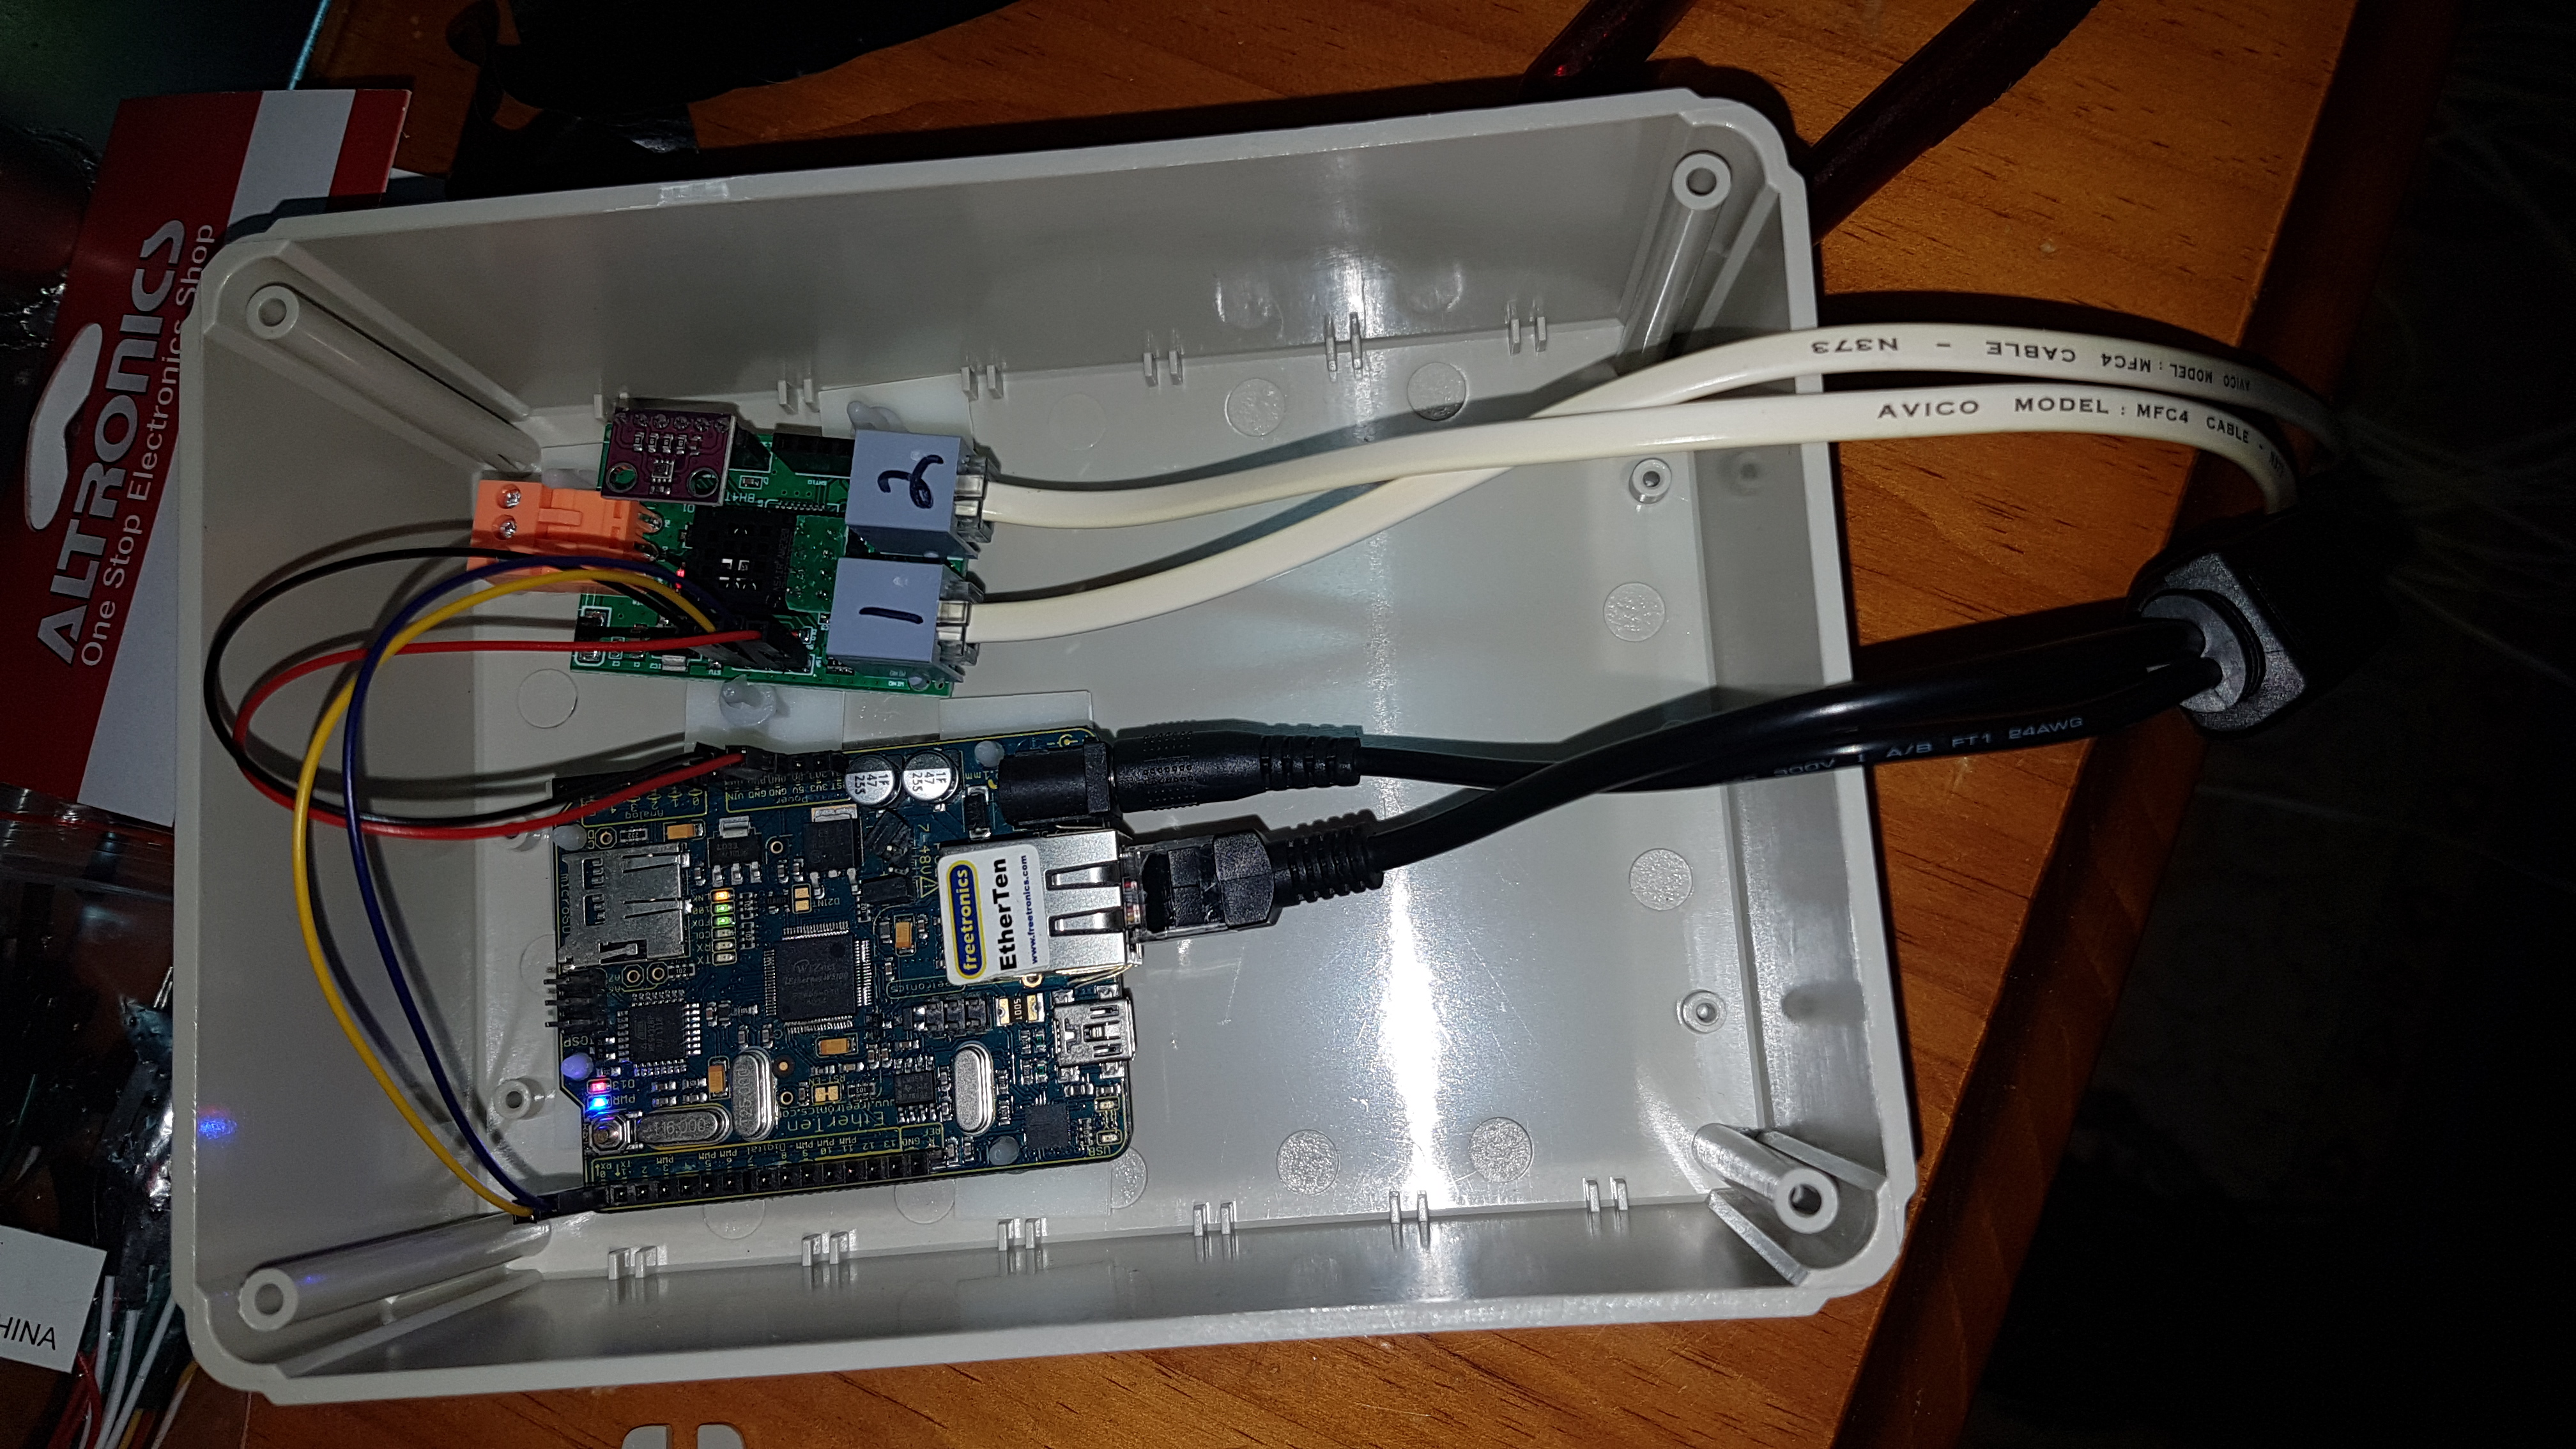
The Arduino and sensors were mounted DIY fashion inside a project box. I used a dremel to cut a hole in the plastic lid to feed the cabling through so that it would sit flush with the eves.
Programming:
Arduino:
In order to collect and output the data I had to recycle some code from the Arduino website, and some code from other places (credit in the code). My contribution was building in some error checking. The sensor unit, as it turned out, was not always accurate and would quite often return garbage data. In order to fix this I programmed the arduino to check the data twice and compare the results. Both results had to pass a sanity check: Here in Perth, WA it never gets below -5 or above 55, nor does the barometric pressure wildly fluctuate either. So, only report the data if the data was within range, and the values had to be reasonable close to each other. Strictly speaking this will not stop all bad data, but it seems to do a good enough job 99.99% of the time. See above for a link to my github project.
ELK Stack:
I’ve provided on github the pipeline configuration you will need in order to use logstash to connect to your arduino and pull the json data. If you don’t have an openweathermap account, it is possible to remove the appropriate section from the 01-http-weather.conf file. You will need to add the files to your /etc/logstash/conf.d directory and add the pipelines to logstash by modifying the pipelines.yml file.
The last step will be to use the code snippets in the mappings_script file. From within the dev tools section of Kibana, run the below PUT command. This will tell Elasticsearch about the data coming in and correctly map the data types:
PUT /weather/_mappings/doc
{
"properties": {
"coord": {"type": "geo_point"},
"coordlocal": {"type": "geo_point"},
"dt": {"type": "date"},
"localdt": {"type": "date"},
"sys.sunrise": {"type": "date"},
"sys.sunset": {"type": "date"},
"clouds.all": {"type": "float"},
"main.humidity": {"type": "float"},
"main.temp": {"type": "float"},
"main.pressure": {"type": "float"},
"rain.3hr": {"type": "float"},
"visibility": {"type": "float"},
"weather.humidity": {"type": "float"},
"weather.temp": {"type": "float"},
"weather.pressure": {"type": "float"},
"wind.deg": {"type": "float"},
"wind.speed": {"type": "float"},
"wind.localspeed": {"type": "float"},
"wind.localdeg": {"type": "float"},
"wind.localgust": {"type": "float"},
"localrain.1h": {"type": "float"},
"localrain.24h": {"type": "float"}
}
}
And that is it!
At this point, you should have a working weather station with log stash pulling the data and pushing it to elasticsearch. I haven’t detailed how to build the graphs or dashboards to display the data, but there is plenty of documentation available online.
Sensor Inaccuracy/Future Improvements:
After mounting the sensors I had discovered that the heat generated from the electronics does interfere with the reading. The top line represents the temperature read from my weather station, and the bottom line is data from OpenWeatherMap.
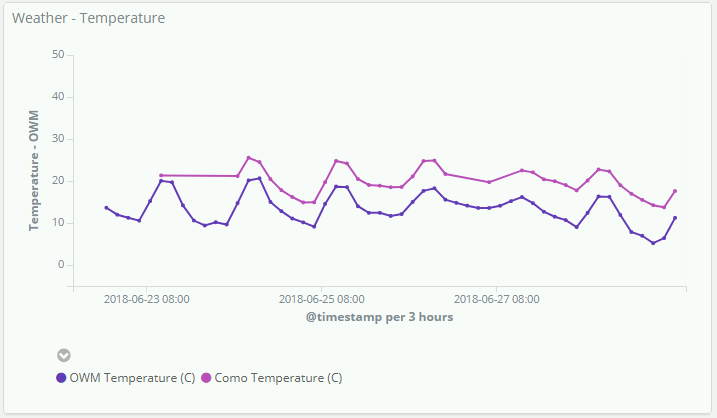
The solution, when I have time later, will be to drill more holes in the project box to allow better air flow and partition the arduino away from the sensors to better isolate the heat that is generated.
In the end I moved the temperature/humidity sensor outside the enclosure and now my readings closely match those provided by open weather map