This week my wife asked me to create for her a blog. As such I’ve had to rejig the www server to make space for her new domain.
The process is quite simple:
- Create the new user on the www server so she has sftp access.
- Create a mailbox, and mysql database for the new user.
- Create the directory structure, copy the latest wordpress to it and set file permissions.
- Create the DNS entries in my DNS provider, and locally on my home DNS
- Copy and edit my blog’s apache config files.
- Enable the new site -without SSL
- Update the Let’s Encrypt certificate files with the new domain
- Enable the SSL website.
- Configure wordpress.
In detail:
Create a new user on the web server with adduser -D
Depending on your setup, create a new mailbox, if you like and create a new database and user. I use phpmyadmin and postfixadmin for these tasks. Remember to note down the passwords and make them secure! Use a random password generator if needs must.
I created the directory structure in /var/www/bel.warbel.net/ moving forward, I think it would be more secure to have user’s websites stored in their home directories and then have the users jailed to stop access to the wider system. It would also make sense to have the sub domain match their username for simplicity’s sake. Be sure to change ownership once you’ve copied in the latest word press: chown USER:www-data /var/www/bel.warbel.net -R
WordPress (as www-data) will need write permissions on the sub directories particularly in the data directories to allow for downloading plugins and themes. Be sure to chmod g+w those directories.
At this point, if you have not done so already, create the DNS entries for your site. For me this meant updating my internal DNS records with a CNAME for bel.warbel.net to point to www.warbel.net, which I replicated on my own DNS hosts: https://www.noip.com/ who I recommend. As I do not have a static IP address, I use their dyndns services on my router.
Next, I copied the /etc/apache2/sites-available/blog.warbel.net.conf and blog.warbel.net-le-ssl.conf and renamed them to bel.warbel.net.conf and bel.warbel.net-le-ssl.conf respectively. The let’s encrypt program will, initially, not expect to see a SSL site, so I commented out the redirects in the non-ssl file and updated the config file for all the references to the hostname and root directories.
Enable the new site: a2ensite bel.warbel.net; service apache2 reload
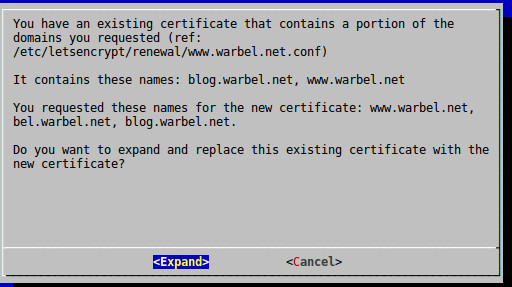
Run the ssl certificate generator with all the domains you need:
sudo letsencrypt certonly –webroot -w /var/www/html -d www.warbel.net -w /var/www/bel.warbel.net -d bel.warbel.net -w /var/www/blog.warbel.net -d blog.warbel.net
If successful, it will show you a screen, prompting you to agree to update the certificate with the new domain:
At this point, it is safe and appropriate to enable the ssl site with: a2ensite bel.warbel.net-le-ssl.conf; service apache2 reload
Be sure to edit the non-ssl site’s config and re-enable forced ssl.
Finally, configure the new wordpress site. I found that to enable uploading files (updates etc) I needed to add a line to wp-config.php:
define(‘FS_METHOD’, ‘direct’);