Background:
Like many IT people in Perth, Australia , I buy my gear for the most part from PLE computers. And that includes their uninterruptible power supplies (UPS). The most reasonably priced desktop grade UPS’s are the Powershield Defender series. Of which I have two:
- Power Shield Defender LCD 650VA UPS (requiring the blazer_usb driver)
- Power Shield Defender LCD 1.2KVA UPS (requiring the usbhid-ups driver)
On Windows I would simply plug in the devices and install their drivers. On Linux however, nothing is that simple. This guide will work through connecting and confguring the UPSs on Linux. As it’s important to know that status of the battery and know when its time to replace them, I also want to be able to monitor my UPSs using my monitoring solution – Zabbix.
Install Network UPS Tools
To get started, install the Network UPS tools.
sudo apt install nut
Identify Your UPS
The 1.2KVA identifies itself as:
:~$ lsusb
...
Bus 001 Device 003: ID 0764:0501 Cyber Power System, Inc. CP1500 AVR UPS
...
And the 650KVA reports as:
:~$ lsusb
...
Bus 004 Device 002: ID 0665:5161 Cypress Semiconductor USB to Serial
...
Configure NUT
Edit /etc/ups.conf:
As they use different drivers, append the following to the end of the file, replacing the section in the brackets with your own name if you like:
[defender]
# use either blazer_usb or usbhid-ups depending on your UPS
driver = blazer_usb
port = auto
desc = "Add your description"
Edit /etc/nut.conf and change:
MODE=none
to:
MODE=standalone
Add users to the nut-monitor service. These users can change settings on the UPS or simply have read access on them. Edit the file /etc/nut/upsd.users. Un-comment and edit the lines:
[admin]
password = yourpassword
actions = SET
instcmds = ALL
...
 [upsmon]
 password = yourotherpassword
 upsmon master
Creating the admin account will allow you to test or send commands to the UPS. More on that later.
As the instructions say in the file itself, edit the /etc/upsmon.conf file next. It is worth reading the options and setting them to your desired state, pay particular attention to the MONITOR section. Append the following to your file:
MONITOR defender@localhost 1 upsmon yourotherpassword master
Start the service with and check that everything is working:
$ sudo service nut-server restart
$ sudo service nut-server status
● nut-server.service - LSB: Network UPS Tools initscript
 Loaded: loaded (/etc/init.d/nut-server; bad; vendor preset: enabled)
 Active: active (running) since Fri 2017-09-15 16:08:42 AWST; 4s ago
 Docs: man:systemd-sysv-generator(8)
 Process: 19871 ExecStop=/etc/init.d/nut-server stop (code=exited, status=0/SUCCESS)
 Process: 19878 ExecStart=/etc/init.d/nut-server start (code=exited, status=0/SUCCESS)
 Tasks: 2
 Memory: 2.4M
 CPU: 50ms
 CGroup: /system.slice/nut-server.service
 ├─19906 /lib/nut/usbhid-ups -a defender
 └─19908 /lib/nut/upsd

Sep 15 16:08:42 atlas systemd[1]: Starting LSB: Network UPS Tools initscript...
Sep 15 16:08:42 atlas nut-server[19878]: * Starting NUT - power devices information server and drivers
Sep 15 16:08:42 atlas usbhid-ups[19906]: Startup successful
Sep 15 16:08:42 atlas upsd[19907]: listening on 127.0.0.1 port 3493
Sep 15 16:08:42 atlas upsd[19907]: not listening on ::1 port 3493
Sep 15 16:08:42 atlas upsd[19907]: Connected to UPS [defender]: usbhid-ups-defender
Sep 15 16:08:42 atlas upsd[19908]: Startup successful
Sep 15 16:08:42 atlas nut-server[19878]: ...done.
Sep 15 16:08:42 atlas systemd[1]: Started LSB: Network UPS Tools initscript.
Testing and Configuring the UPS
Run the command below to get the current status of the UPS:
$ sudo upsc defender@localhost
It will return a long list of values if it is successful.
Run a quick test of the battery with the admin account and check the progress:
$ sudo upscmd -u admin -p yourpassword defender test.battery.start.quick
$ sudo upsc defender@localhost
ps.status: OL DISCHRG
ups.test.result: In progress
...
$ sudo upsc defender@localhost
ups.status: OL CHRG
ups.test.result: Done and passed
More commands for the blazer_usb UPS can be found here, the test command, at least, also works for the usbhid-ups driver too.
Having come this far you should have a basic UPS in a working configuration.
Configure Zabbix
download or clone the git repository to your computers with the UPS attached.
$ git clone https://github.com/delin/Zabbix-NUT-Template.git
$ cd Zabbix-NUT-Template
Copy the files to their proper location:
$ sudo cp -r sh/ /etc/zabbix/
$ sudo cp zabbix_agentd.d/userparameter_nut.conf /etc/zabbix/zabbix_agentd.conf.d/
Restart the Zabbix services both on the agent and server.
sudo service zabbix-agent restart
sudo service zabbix-server restart
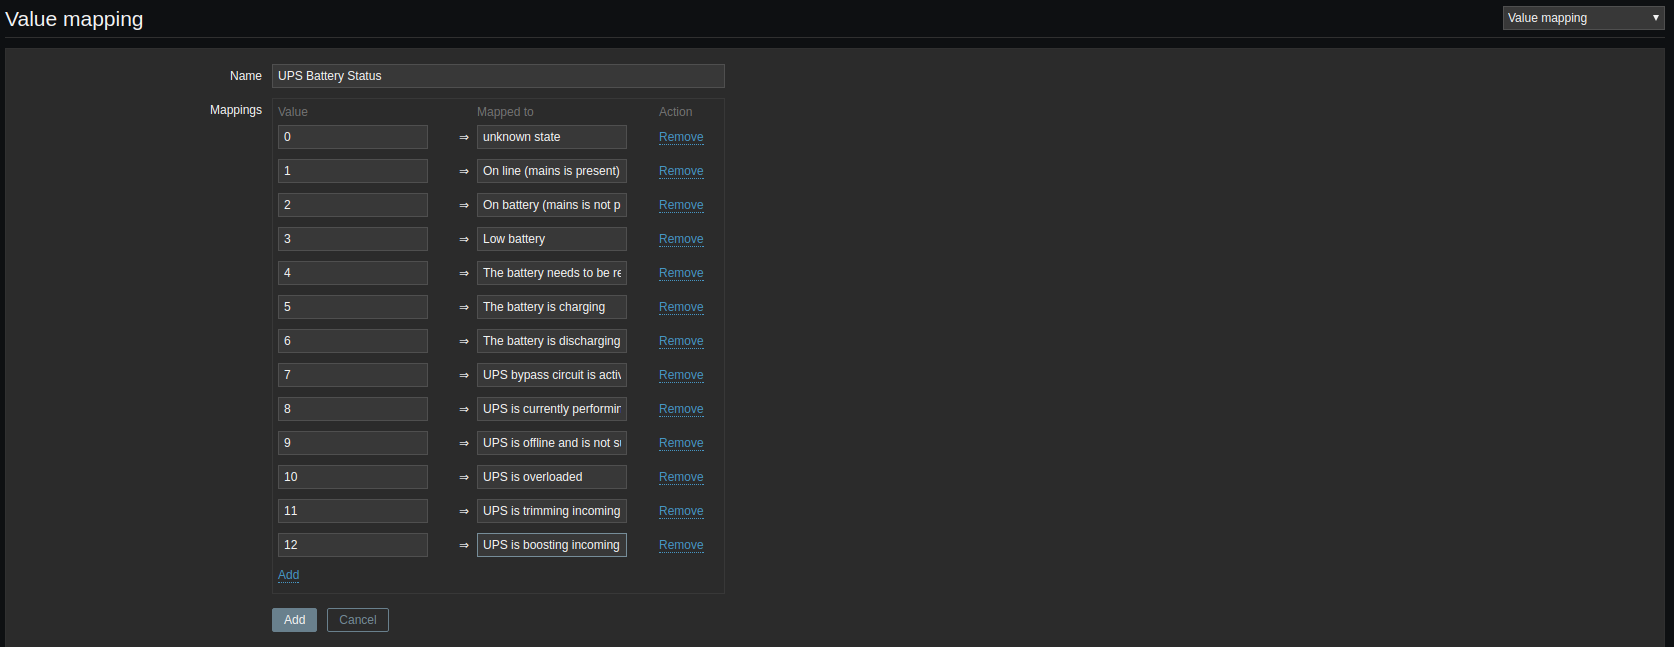
On your desktop, download/clone the git repository. Log into Zabbix. Follow the instructions and create the value mapping.

Import the Zabbix template. In the usual way and link it to your servers.
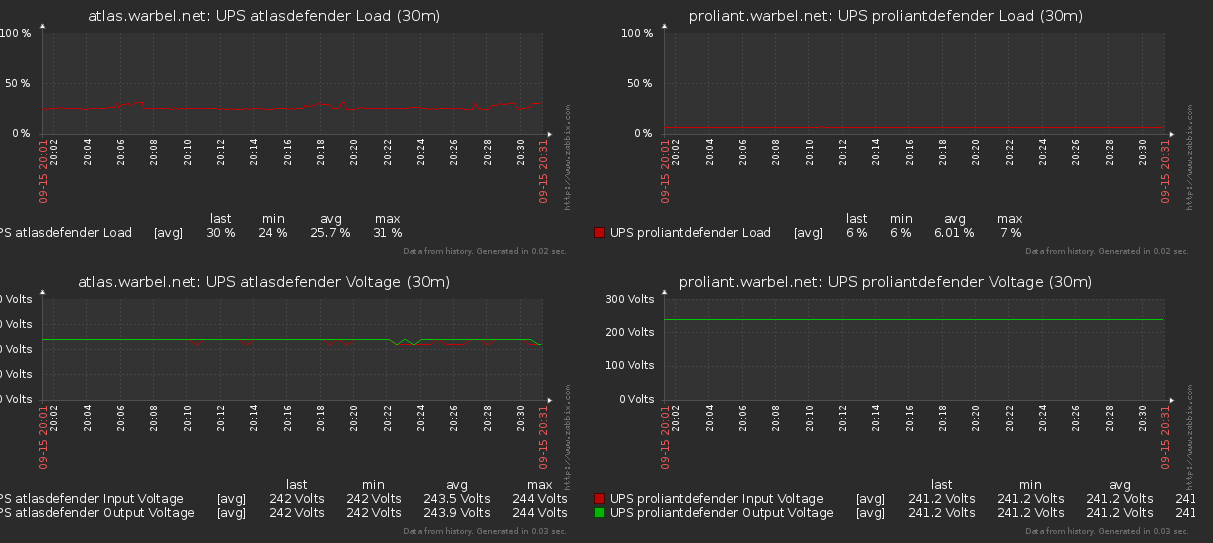
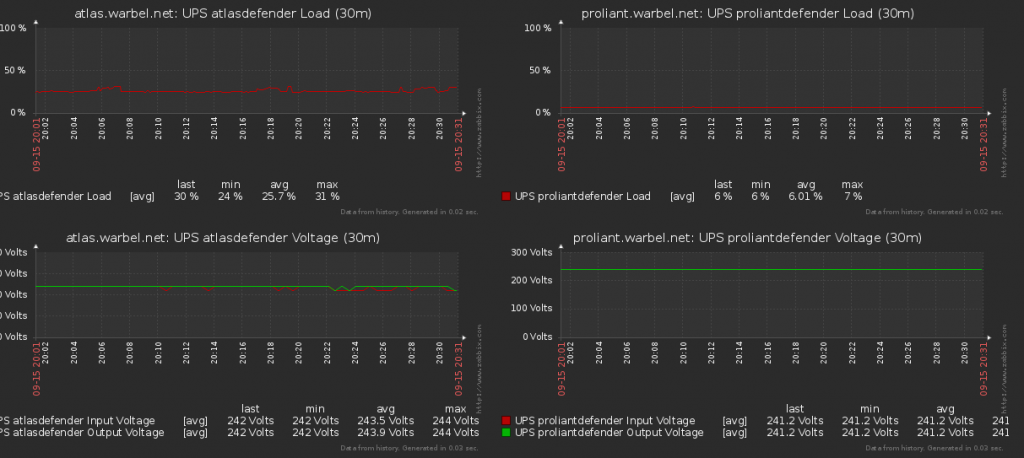
If you feel like it, create a new screen to monitor your UPS.
And you’re done! No more guessing and hoping your UPS’s haven’t swapped to battery when you’re away from home.
Troubleshooting:
The Powershield UPS that uses the driver usbhid-ups has a habit of dropping out, with the error message that the data is stale. I attempted a work around with a script with the following in /root/restart_service.sh:
#!/bin/sh
#Get the error state:
ErrorState=`upsc defender@localhost 2>&1|grep -v SSL|cut -b 1-5|tail -1`;
#If the error state is equal to "Error" then restart the service
if [ $ErrorState = "Error" ]
then
 service nut-server restart
 echo "Restarting nut-server" >> /var/log/syslog
fi
And edited the crontab for root with sudo crontab -e and add the following line:
* * * * * /bin/bash -l -c "/root/restart_service.sh; sleep 30 ; /root/restart_service.sh"
Unfortunately this did not resolve my issue! Eventually I played around with a few settings, ultimately arriving at adjusting the maxretry in ups.conf. Changing it to:
maxretry=5
I also adjusted the polling interval to 60 seconds.
Resources:
Big thanks to http://nitestick.net/nut-for-defender-1200/ whom I mostly followed to get this working.
Blazer USB documentation: http://networkupstools.org/docs/man/blazer_usb.html
Zabbix NUT templates: https://github.com/delin/Zabbix-NUT-Template
NUT documentation page, which helped me to narrow down the drivers I needed: http://networkupstools.org/stable-hcl.html
I also referenced: http://tedfelix.com/software/nut-network-ups-tools.html