Configuring Ubiquiti Powerbeam with custom TLS Certificates

Background

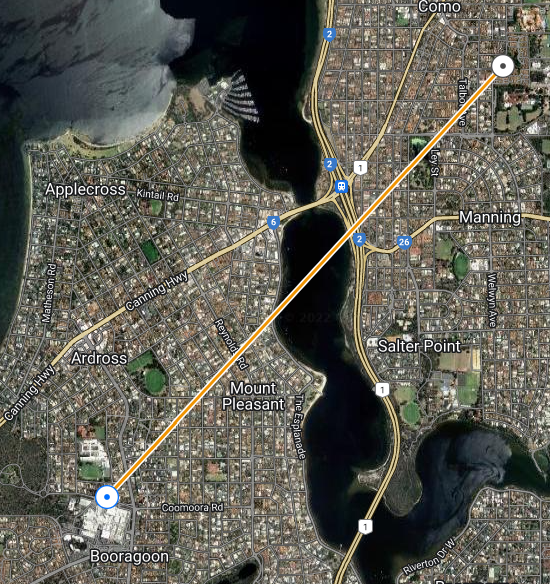
I recently re-connected the WA Freenet (discord here), an open WiFi wide-area-network that spans the Perth metropolitan area. Perth has an ideal geography for a WiFi network as it is extraordinarily flat, with an escarpment running along the eastern spine with excellent line-of-site to the suburbs.

I had joined the WAFN many years ago and it is thanks to the other operators on the network that, at the time, I was able to learn how to configure IPv4 subnets, firewalls, and BGP routing, skills that have served me well in my professional career.

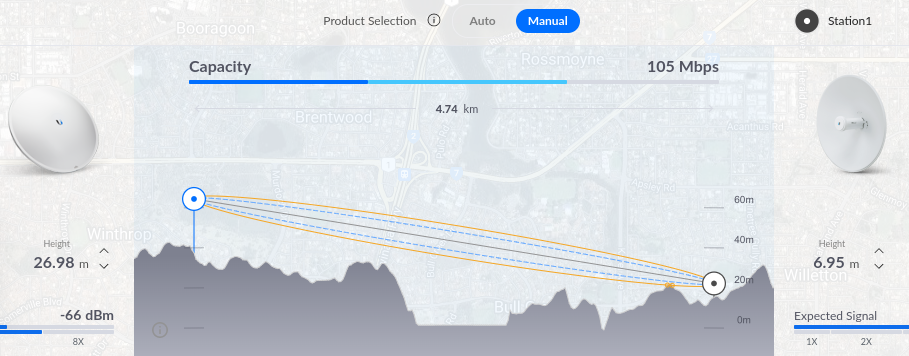
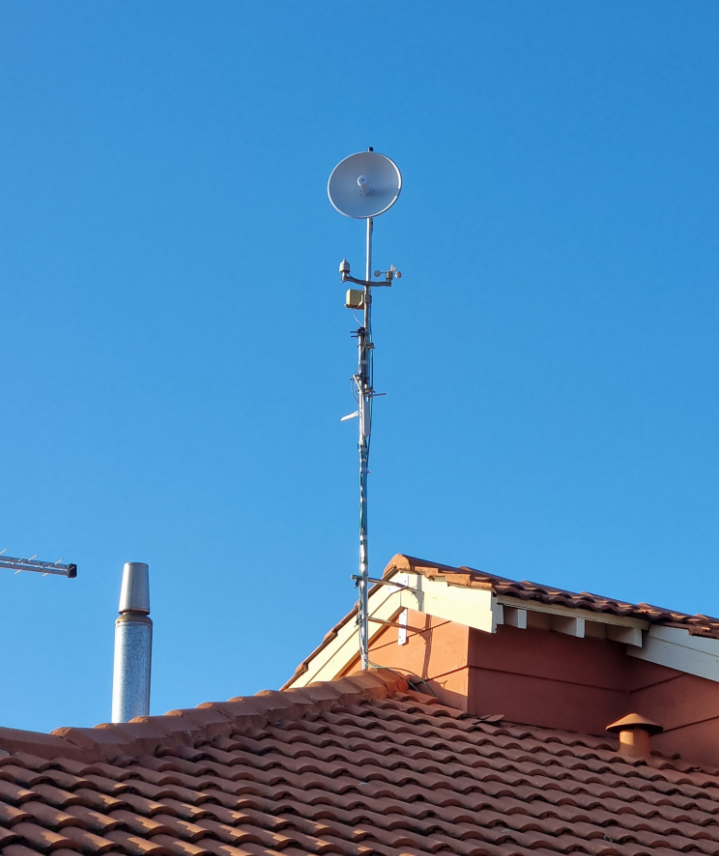
Moving forward to the present day, I was pleasantly surprised to find that I was able to connect to an existing AP with links to the backbone of the network from my address. So I purchased two new radios – a Powerbeam AC 500 for my link in Ardross, and a Powerbeam 5AC Gen2 for my roof at home. Without much hassle, and with the support of the WAFN community, I was able to reconfigure my Ubiquiti Edgerouter with BGP, advertise my routes and accept those advertised to me.

Problem:

I personally hate seeing the ‘this website is insure’ messages that appear when a site uses self signed certificates. At home, I secure all my internal websites, devices and appliances with my internal CA certificates. So I wanted to do the same for the new radios. However, I was unable to find a website that outlined the entire process end-to-end, so thought I should write one myself.

Process:

Firstly, download the custom-script firmware for your device and install it. From the table below, it is easy to deduce the URL to download the appropriate firmware from UBNT.

Firmware Table Examples
Version Model URL of Hardware Non-CS CS
8.7.11 Powerbeam 5AC 500 UBNT Website https://dl.ui.com/firmwares/XC-fw/v8.7.11/XC.v8.7.11.46972.220614.0419.bin https://dl.ui.com/firmwares/XC-fw/v8.7.11/XC.v8.7.11-cs.46972.220614.0419.bin
8.7.11 Powerbeam 5AC Gen 2 UBNT Website https://dl.ui.com/firmwares/XC-fw/v8.7.11/WA.v8.7.11.46972.220614.0420.bin https://dl.ui.com/firmwares/XC-fw/v8.7.11/WA.v8.7.11-cs.46972.220614.0420.bin

Don’t forget also, that you will need to setup DNS to point to your device with its internal hostname. 

The custom script (CS) firmware version is important because it is necessary to run a script on the device at boot time.

Then, generate your TLS certificates. How you do that is not covered here. I personally use easyrsa to manage my internal certificates. I also deploy my root CA certificate to all my devices via AD group policy on Windows, or via Ansible for my linux hosts.

You should have a certificate that looks something like the below, called server3.crt

-----BEGIN CERTIFICATE-----

MIIG1TCCB....

-----END CERTIFICATE-----

-----BEGIN RSA PRIVATE KEY-----

TlI0kiQCiPGN...

-----END RSA PRIVATE KEY-----

Then upload the certificate to your device:

scp server3.crt ubnt@<device>:/etc/persistent/https/server3.pem

Log into the powerbeam via SSH: Create rc file in ‘/etc/persistent/rc.poststart’ with following content

#!/usr/bin/sh
cp /etc/persistent/https/server3.pem /etc/server.pem
kill $(ps | grep [l]ighttpd | awk '{ print $1 }')

Then make it executable, save the configuration and reboot

chmod +x /etc/persistent/rc.poststart
save
reboot

And done! 

References: https://community.ui.com/questions/AirOS-8-custom-SSL-certificates-Guide-Resolved/fcf2d671-1933-4fe1-bdcb-ba33a94020e4 

Images


Vodafone NBN (FTTP) IPv6 Prefix Delegation on a Ubiquiti EdgeRouter Lite

Background

I’ve always been intimidated by IPv6, the addresses were long and confusing, and not fully understanding the technology made me nervous to integrate it into my systems. How did it work? Would enabling it expose everything in my LAN to the internet? Would I find myself under attack without realising it?

Well, the good news is that smarter people have already thought about the problems above (and more) and engineered an addressing system with built-in security and automatic configuration (SLAAC). So if you use a firewall on your router, IPv6 will give you the benefits of having externally accessible IP addresses on your LAN that can be routed, if you allow it.

I found a lot of misinformation and confusion around IPv6 online. So if you’re looking for general information on IPv6 review the videos below, I also found the instructions here: https://medium.com/@nurblieh/ipv6-on-the-edgerouter-lite-c95e3cc8d49d invaluable.

Finally, I was able to guess at the correct settings to use on Vodafone NBN to obtain IPv6 addresses. I called Vodafone’s support number – email, weirdly, wasn’t an option – unfortunately their support wasn’t great, and all I was able to find was that they do offer IPv6, but not technical advice. Thankfully their IPv6 technology implementation is standard to the point of being boring and I guessed at the right settings, eventually getting it right.

Configuration

To get IPv6 prefix delegation working on the edgerouter with Vodafone FTTP NBN a few steps need to be taken:

  1. Setup the firewalls WAN6_In and WAN6_LOCAL on the EdgeRouter to allow IPv6 traffic and assign it to the internet interface.
  2. Enable dhcpv6-pd on the internet Ethernet port, request a /56 from Vodafone.
  3. Delegate /64 subdomains to each interface on your network. If I understand it correctly, there should be 255 available networks to assign.
  4. I personally disable DNS name servers being advertised to

Generally I use the config tree to do configuration, however to save time, I’ve included below the relevant settings to enable IPv6 taken from the config file. If I’ve missed something please let me know in the comments.

The below settings contain the firewall settings for an IPv6 connection. I’ve removed IP addresses, but left the configuration to show to poke holes in the firewall to allow services through directly to servers. As it has been mentioned elsewhere on the internet, allowing ICMPv6 through is critical for IPv6 to function correctly.

firewall {
     ...
     ipv6-name WAN6_IN {
         default-action drop
         rule 10 {
             action accept
             description "allow established"
             protocol all
             state {
                 established enable
                 related enable
             }
         }
         rule 20 {
             action drop
             description "drop invalid packets"
             protocol all
             state {
                 invalid enable
             }
         }
         rule 30 {
             action accept
             description "allow ICMPv6"
             protocol icmpv6
         }
         rule 40 {
             action accept
             description "allow traffic for www"
             destination {
                 address xxx
             }
             protocol tcp
         }
         rule 41 {
             action accept
             description "Allow SSH (v6) to Atlas"
             destination {
                 address xxx
                 port 22
             }
             protocol tcp
         }
         rule 42 {
             action accept
             description "Allow Ipv6 to Plex"
             destination {
                 address xxx
                 port 32400
             }
             protocol tcp
         }
     }
     ipv6-name WAN6_LOCAL {
         default-action drop
         rule 10 {
             action accept
             description "allow established"
             protocol all
             state {
                 established enable
                 related enable
             }
         }
         rule 20 {
             action drop
             description "drop invalid packets"
             protocol all
             state {
                 invalid enable
             }
         }
         rule 30 {
             action accept
             description "allow ICMPv6"
             protocol icmpv6
         }
         rule 40 {
             action accept
             description "allow DHCPv6 client/server"
             destination {
                 port 546
             }
             protocol udp
             source {
                 port 547
             }
         }
     }

The below section contains the details on how to configure an interface for dhcpv6-pd. You may notice that I have multiple interfaces that I have advertised IPv6 to. It’s important to realise the function of the prefix-id and host address fields. The prefix-id is, apparently, a 2 digit hexadecimal number from 00 to FF representing 0-255. It indicates which /64 subnet to assign to the interface. The host address is the address that the router will assign itself on that subnet. I’ve disabled dns on my interfaces, as I would prefer my systems to use my internal DNS for all requests and my internal DNS servers are configured to resolve A and AAAA records.

interfaces {
     ethernet eth0 {
         address dhcp
         description "Internet (IPoE)"
         dhcpv6-pd {
             pd 0 {
                 interface eth1 {
                     host-address ::1
                     no-dns
                     prefix-id :1
                     service slaac
                 }
                 interface eth1.3 {
                     host-address ::1
                     no-dns
                     prefix-id :2
                     service slaac
                 }
                 interface eth1.4 {
                     host-address ::1
                     no-dns
                     prefix-id :3
                     service slaac
                 }
                 interface eth2 {
                     host-address ::1
                     no-dns
                     prefix-id :4
                     service slaac
                 }
                 prefix-length /56
             }
             rapid-commit enable
         }
         duplex auto
         firewall {
             in {
                 ipv6-name WAN6_IN
                 name WAN_IN
             }
             local {
                 ipv6-name WAN6_LOCAL
                 name WAN_LOCAL
             }
         }
         ip {
         }
         ipv6 {
             address {
                 autoconf
             }
             dup-addr-detect-transmits 1
         }
         mtu 1500
         speed auto

Further Notes

I found that implementing IPv6 wasn’t perfect. As I kept playing with the settings, my networked hosts would, using SLAAC, get another IPv6 address without removing the old one and instead just mark them as stale. The easy fix was to manually remove the addresses, but it was tedious. I also had to modify my web server’s configs to properly respond to IPv6 requests. I did that by adding [::]:443 to the virtual host directive eg: <VirtualHost blog.warbel.net:443 [::]:443>

Tools

https://www.vultr.com/resources/subnet-calculator-ipv6/ – The Vultr IPv6 subnet calculator is very handy. As is this calculator: http://www.gestioip.net/cgi-bin/subnet_calculator.cgi

IPv6 up and running