Vodafone NBN (FTTP) IPv6 Prefix Delegation on a Ubiquiti EdgeRouter Lite

Background

I’ve always been intimidated by IPv6, the addresses were long and confusing, and not fully understanding the technology made me nervous to integrate it into my systems. How did it work? Would enabling it expose everything in my LAN to the internet? Would I find myself under attack without realising it?

Well, the good news is that smarter people have already thought about the problems above (and more) and engineered an addressing system with built-in security and automatic configuration (SLAAC). So if you use a firewall on your router, IPv6 will give you the benefits of having externally accessible IP addresses on your LAN that can be routed, if you allow it.

I found a lot of misinformation and confusion around IPv6 online. So if you’re looking for general information on IPv6 review the videos below, I also found the instructions here: https://medium.com/@nurblieh/ipv6-on-the-edgerouter-lite-c95e3cc8d49d invaluable.

Finally, I was able to guess at the correct settings to use on Vodafone NBN to obtain IPv6 addresses. I called Vodafone’s support number – email, weirdly, wasn’t an option – unfortunately their support wasn’t great, and all I was able to find was that they do offer IPv6, but not technical advice. Thankfully their IPv6 technology implementation is standard to the point of being boring and I guessed at the right settings, eventually getting it right.

Configuration

To get IPv6 prefix delegation working on the edgerouter with Vodafone FTTP NBN a few steps need to be taken:

  1. Setup the firewalls WAN6_In and WAN6_LOCAL on the EdgeRouter to allow IPv6 traffic and assign it to the internet interface.
  2. Enable dhcpv6-pd on the internet Ethernet port, request a /56 from Vodafone.
  3. Delegate /64 subdomains to each interface on your network. If I understand it correctly, there should be 255 available networks to assign.
  4. I personally disable DNS name servers being advertised to

Generally I use the config tree to do configuration, however to save time, I’ve included below the relevant settings to enable IPv6 taken from the config file. If I’ve missed something please let me know in the comments.

The below settings contain the firewall settings for an IPv6 connection. I’ve removed IP addresses, but left the configuration to show to poke holes in the firewall to allow services through directly to servers. As it has been mentioned elsewhere on the internet, allowing ICMPv6 through is critical for IPv6 to function correctly.

firewall {
     ...
     ipv6-name WAN6_IN {
         default-action drop
         rule 10 {
             action accept
             description "allow established"
             protocol all
             state {
                 established enable
                 related enable
             }
         }
         rule 20 {
             action drop
             description "drop invalid packets"
             protocol all
             state {
                 invalid enable
             }
         }
         rule 30 {
             action accept
             description "allow ICMPv6"
             protocol icmpv6
         }
         rule 40 {
             action accept
             description "allow traffic for www"
             destination {
                 address xxx
             }
             protocol tcp
         }
         rule 41 {
             action accept
             description "Allow SSH (v6) to Atlas"
             destination {
                 address xxx
                 port 22
             }
             protocol tcp
         }
         rule 42 {
             action accept
             description "Allow Ipv6 to Plex"
             destination {
                 address xxx
                 port 32400
             }
             protocol tcp
         }
     }
     ipv6-name WAN6_LOCAL {
         default-action drop
         rule 10 {
             action accept
             description "allow established"
             protocol all
             state {
                 established enable
                 related enable
             }
         }
         rule 20 {
             action drop
             description "drop invalid packets"
             protocol all
             state {
                 invalid enable
             }
         }
         rule 30 {
             action accept
             description "allow ICMPv6"
             protocol icmpv6
         }
         rule 40 {
             action accept
             description "allow DHCPv6 client/server"
             destination {
                 port 546
             }
             protocol udp
             source {
                 port 547
             }
         }
     }

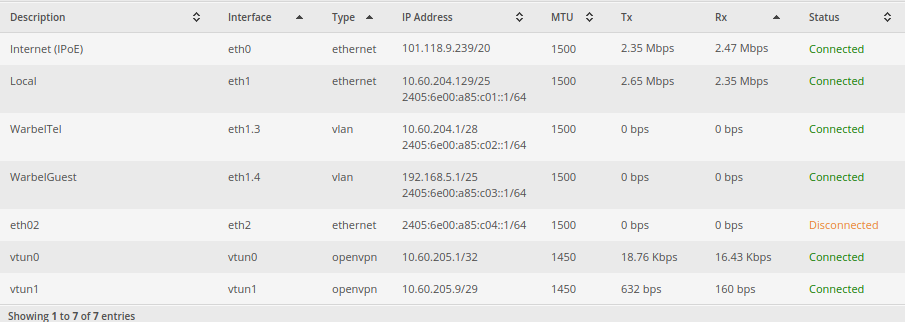
The below section contains the details on how to configure an interface for dhcpv6-pd. You may notice that I have multiple interfaces that I have advertised IPv6 to. It’s important to realise the function of the prefix-id and host address fields. The prefix-id is, apparently, a 2 digit hexadecimal number from 00 to FF representing 0-255. It indicates which /64 subnet to assign to the interface. The host address is the address that the router will assign itself on that subnet. I’ve disabled dns on my interfaces, as I would prefer my systems to use my internal DNS for all requests and my internal DNS servers are configured to resolve A and AAAA records.

interfaces {
     ethernet eth0 {
         address dhcp
         description "Internet (IPoE)"
         dhcpv6-pd {
             pd 0 {
                 interface eth1 {
                     host-address ::1
                     no-dns
                     prefix-id :1
                     service slaac
                 }
                 interface eth1.3 {
                     host-address ::1
                     no-dns
                     prefix-id :2
                     service slaac
                 }
                 interface eth1.4 {
                     host-address ::1
                     no-dns
                     prefix-id :3
                     service slaac
                 }
                 interface eth2 {
                     host-address ::1
                     no-dns
                     prefix-id :4
                     service slaac
                 }
                 prefix-length /56
             }
             rapid-commit enable
         }
         duplex auto
         firewall {
             in {
                 ipv6-name WAN6_IN
                 name WAN_IN
             }
             local {
                 ipv6-name WAN6_LOCAL
                 name WAN_LOCAL
             }
         }
         ip {
         }
         ipv6 {
             address {
                 autoconf
             }
             dup-addr-detect-transmits 1
         }
         mtu 1500
         speed auto

Further Notes

I found that implementing IPv6 wasn’t perfect. As I kept playing with the settings, my networked hosts would, using SLAAC, get another IPv6 address without removing the old one and instead just mark them as stale. The easy fix was to manually remove the addresses, but it was tedious. I also had to modify my web server’s configs to properly respond to IPv6 requests. I did that by adding [::]:443 to the virtual host directive eg: <VirtualHost blog.warbel.net:443 [::]:443>

Tools

https://www.vultr.com/resources/subnet-calculator-ipv6/ – The Vultr IPv6 subnet calculator is very handy. As is this calculator: http://www.gestioip.net/cgi-bin/subnet_calculator.cgi

IPv6 up and running

How to configure a Unifi Controller behind an Apache Reverse Proxy with LetsEncrypt

Background:

I had to do quite a bit of searching in order to get Unifi to work correctly behind an Apache reverse proxy. I found that many people had come up with their own solutions with various odd, to say the least, configuration options in Apache that were mostly unnecessary. It took a little more searching, but eventually I did find how to prevent the WSS error from appearing too.

Before Beginning:

I assume that you have:

  • Already configured Apache and Lets Encrypt previously.
  • DNS already configured correctly and you can easily add another sub-domain.
  • Already installed and configured Unifi Controller on a box, or VM somewhere.

As Unifi runs on a high (+1024) port, I installed the controller directly onto my Apache2 server.

By the end of the process you should have a functional Unifi controller on unfi.domain.com

Configuration:

Before beginning, ensure that you’ve created a new sudomain and pointed it to your public IP. Next, use lets encrypt to expand your certificate file to include the new domain. I usually run this in standalone mode and turn off apache2 while expanding the certificate.

sudo service apache2 stop
sudo letsencrypt certonly -d unifi.domain.com -d www.domain.com -d subdomain.domain.com

Once complete, start apache again.

Create a new site in /et/apache2/sites-available/ called unfi.domain.com-le-ssl.conf
Edit the file to contain the text below. Be sure to edit the references to your SSL certificate files, document root, servername, etc and IP address of your unifi host. Be aware that my unifi controller runs on the same host as my apache server. If needed, you can get the lets encrypt information from one of your other sites configuration files.

<IfModule mod_ssl.c>
<VirtualHost unifi.domain.com:443>
 # The ServerName directive sets the request scheme, hostname and port that
 # the server uses to identify itself. This is used when creating
 # redirection URLs. In the context of virtual hosts, the ServerName
 # specifies what hostname must appear in the request's Host: header to
 # match this virtual host. For the default virtual host (this file) this
 # value is not decisive as it is used as a last resort host regardless.
 # However, you must set it for any further virtual host explicitly.
 #ServerName www.example.com

ServerAdmin webmaster@domain.com
# DocumentRoot /var/www/html

# Available loglevels: trace8, ..., trace1, debug, info, notice, warn,
 # error, crit, alert, emerg.
 # It is also possible to configure the loglevel for particular
 # modules, e.g.
 #LogLevel info ssl:warn

ErrorLog ${APACHE_LOG_DIR}/error.log
 CustomLog ${APACHE_LOG_DIR}/access.log combined

# For most configuration files from conf-available/, which are
 # enabled or disabled at a global level, it is possible to
 # include a line for only one particular virtual host. For example the
 # following line enables the CGI configuration for this host only
 # after it has been globally disabled with "a2disconf".
 #Include conf-available/serve-cgi-bin.conf
SSLCertificateFile /etc/letsencrypt/live/domain.com/fullchain.pem
SSLCertificateKeyFile /etc/letsencrypt/live/domain.com/privkey.pem
Include /etc/letsencrypt/options-ssl-apache.conf
ServerName unifi.domain.com

ProxyRequests Off
ProxyPreserveHost On

# HSTS (mod_headers is required) (15768000 seconds = 6 months)
Header always set Strict-Transport-Security "max-age=15768000"

<Proxy *>
Order deny,allow
Allow from all
</Proxy>

SSLProxyEngine On
SSLProxyVerify none

SSLProxyCheckPeerCN off
SSLProxyCheckPeerName off
SSLProxyCheckPeerExpire off

AllowEncodedSlashes NoDecode
ProxyPass "/wss/" "wss://127.0.0.1:8443/wss/"
ProxyPassReverse "/wss/" "wss://127.0.0.1:8443/wss/"
ProxyPass "/" "https://127.0.0.1:8443/"
ProxyPassReverse "/" "https://127.0.0.1:8443/"

</VirtualHost>

</IfModule>

Then enable the site with:

sudo a2ensite unifi.subdomain.com-le-ssl.conf;sudo service apache2 reload

And that should do it! Any questions or comments, please post below.

How to Configure Collabora with NextCloud behind an Apache2 Reverse Proxy

Background:

I’ve become increasingly aware (read: paranoid) about the amount of information that Google and Facebook collect about me which they then sell to advertisers for a profit. I don’t appreciate Google reading my emails and personal communications and using that information to sell advertising. Unfortunately for me their services are useful but are replaceable, at leas for me with a fast NBN connection. As such I’ve set off to remove my self as much as possible from their reach.

I’ve already setup mailinabox and Nextcloud, but I’ve missed the ability to edit documents online with Google Drive. Thankfully Nextcloud provide an answer with Collabora. Unfortunately their documentation isn’t very clear, however with a little playing around I was able to get things working. 🙂

Process:

On my web server virtual machine, I installed docker and docker.io

sudo apt install docker docker.io

Download collabora:

sudo docker pull collabora/code

As per the instructions, create a new subdomain (with letsencrypt) called office.warbel.net. If you use letsencrypt, you will need to create a new certificate inclusive of all your domains hosted on the web server.

sudo service apache2 stop
sudo letsencrypt certonly -d bel.warbel.net -d www.warbel.net -d blog.warbel.net -d travel.warbel.net -d mattermost.warbel.net -d office.warbel.net
sudo service apache2 start

Run the Collabora image. Being sure to run the image with the domain name of the server that hosts the image, NOT office.yourdomain.net

sudo docker run -t -d -p 127.0.0.1:9980:9980 -e 'domain=www\\.warbel\\.net' --restart always --cap-add MKNOD collabora/code

Run the command to check the status of the image:

sudo docker ps

Will return: (the name will change, it is random)

CONTAINER ID IMAGE COMMAND CREATED STATUS PORTS NAMES
2e21004691d9 collabora/code "/bin/sh -c 'bash sta" 3 days ago Up 3 days 127.0.0.1:9980->9980/tcp boring_ardinghelli

To stop, and then kill the docker image:

sudo docker stop boring_ardinghelli; sudo docker rm boring_ardinghelli

Once you are confident that the image is up and running create a new site in /etc/apache2/sites-available/ and call it what you will. I called mine: office.warbel.net.conf with the following configuration:

<VirtualHost office.warbel.net:443>

ServerName office.warbel.net
SSLHonorCipherOrder on

# Encoded slashes need to be allowed
AllowEncodedSlashes NoDecode

# Container uses a unique non-signed certificate
SSLProxyEngine On
SSLProxyVerify None
SSLProxyCheckPeerCN Off
SSLProxyCheckPeerName Off

# keep the host
ProxyPreserveHost On

# static html, js, images, etc. served from loolwsd
# loleaflet is the client part of LibreOffice Online
ProxyPass /loleaflet https://127.0.0.1:9980/loleaflet retry=0
ProxyPassReverse /loleaflet https://127.0.0.1:9980/loleaflet

# WOPI discovery URL
ProxyPass /hosting/discovery https://127.0.0.1:9980/hosting/discovery retry=0
ProxyPassReverse /hosting/discovery https://127.0.0.1:9980/hosting/discovery

# Main websocket
ProxyPassMatch "/lool/(.*)/ws$" wss://127.0.0.1:9980/lool/$1/ws nocanon

# Admin Console websocket
ProxyPass /lool/adminws wss://127.0.0.1:9980/lool/adminws

# Download as, Fullscreen presentation and Image upload operations
ProxyPass /lool https://127.0.0.1:9980/lool
ProxyPassReverse /lool https://127.0.0.1:9980/lool

</VirtualHost>

Finally, in nextcloud, add the plugin as per nextclouds documentation and add the domain office.yourdomain.com:443 to the collabora plugin url.

Troubleshooting:

I have a unique custom firewall script that interferes with docker.io. Docker, when it creates a container will add rules to it’s own chain. However my firewall script will delete those chains when it starts. The work around is to restart the docker.io service after the machine boots to recreate the chain and allow networking to start.

I’ve also had to add custom firewall chains to my scripts to allow docker to work.These are (iptables -S):

-A FORWARD -j DOCKER-ISOLATION
-A FORWARD -o docker0 -j DOCKER
-A FORWARD -o docker0 -m conntrack --ctstate RELATED,ESTABLISHED -j ACCEPT
-A FORWARD -i docker0 ! -o docker0 -j ACCEPT
-A FORWARD -i docker0 -o docker0 -j ACCEPT
-A DOCKER -d 172.17.0.2/32 ! -i docker0 -o docker0 -p tcp -m tcp --dport 9980 -j ACCEPT
-A DOCKER-ISOLATION -j RETURN

When the machine restarts I need to manually restart docker to get things going again. I’ll figure out how to fix this later…

Docker taking up too much space.

I’ve found that every time I’ve killed and started the docker image the space the image takes up remains. Some googling has helped me find a solution:

docker rmi $(docker images -f "dangling=true" -q)

and

docker rm -v $(docker ps -a -q -f status=exited)

Do the job pretty well.