Enabling Secure SSL to Roundcube, Postfixadmin, Sonarr and Deluge with an Apache Reverse Proxy

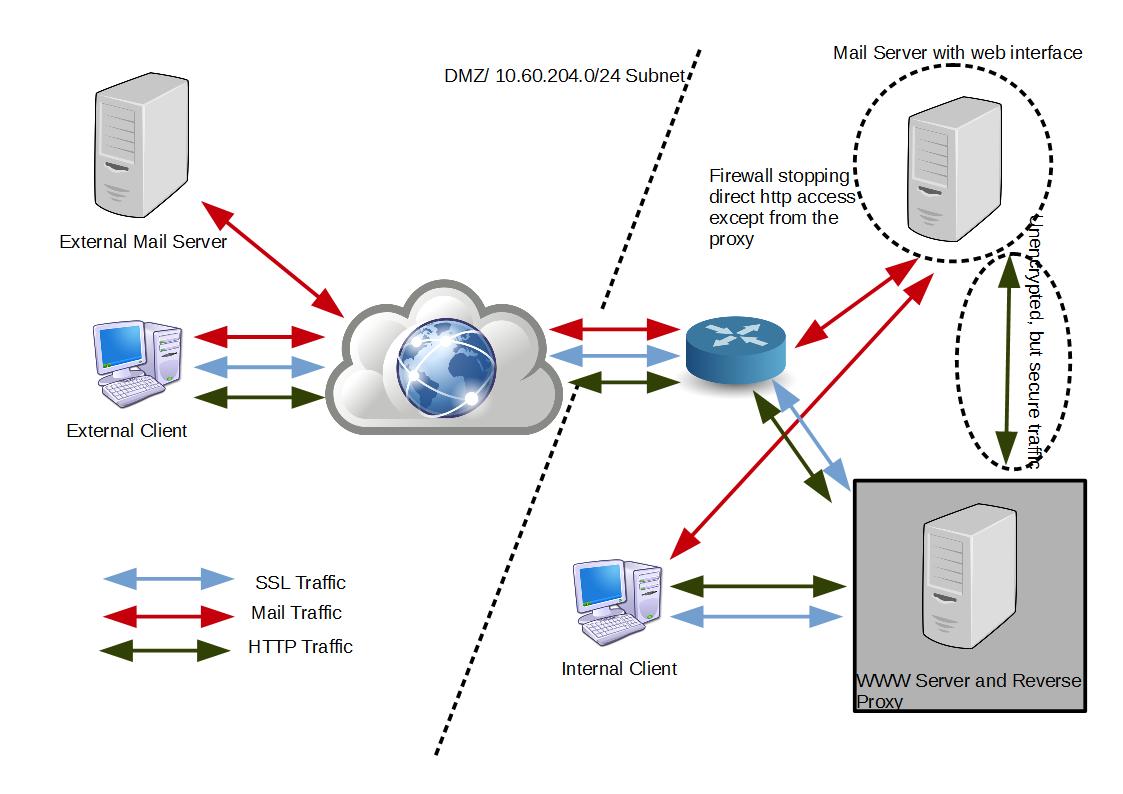
As discussed in earlier posts I have hit the limits of what you might call ‘standard’ hosting. As I have multiple machines, both physical and virtual and only a single externally accessible IP address I needed to figure out how to allow access to certain URLs and applications on these machines without relying on NAT and port forwarding rules at the router (layer 3 routing). I also needed to do this securely using SSL.

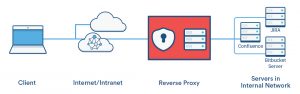
This blog entry will outline that process that I followed to modify a significant number of applications to allow access through a single apache host that handled all incoming requests, and secures them with SSL to the client.

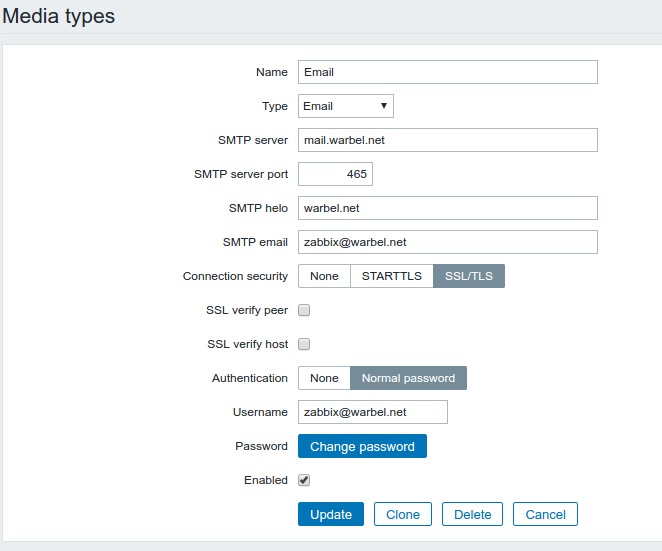
As my mail server already had SSL configured it needed to be disabled and go back to only accepting traffic on port 80. As all incoming traffic will be from the reverse proxy and a firewall will block all other requests, this will be secure.

Begin by creating a backup of the VM of the mail server. Then on the mail server (once running again):

Disable the SSL site:
sudo a2dissite default-ssl.conf

Disable SSL forwarding in the .htaccess file in /var/www/html/ such that the file will now look like:

#RewriteEngine On

# Redirect all HTTP traffic to HTTPS.
#RewriteCond %{HTTPS} !=on
#RewriteRule ^/?(.*) https://%{SERVER_NAME}/$1 [R,L]

# Send / to /roundcube.
#RewriteRule ^/?$ /roundcube [L]

Edit the roudcube config/var/www/html/roundcube/config/config.inc.php to stop it from forcing ssl. Look for and change the line to false like below:
$config[‘force_https’] = false;

Remove https redirect from the default config in apache and remove the servername directive:
sudo vi /etc/apache2/sites-enabled/000-default.conf

#RewriteEngine on
#RewriteCond %{SERVER_NAME} =mail.warbel.net
#RewriteRule ^ https://%{SERVER_NAME}%{REQUEST_URI} [END,QSA,R=permanent]
#ServerName mail.warbel.net

This is important as we dont want incoming request to again be forwarded.

To fix forwarding/proxing issues with Owncloud there is ample documetion available on their site. The short of it is to edit /var/www/owncloud/config/config.php to include the following lines (modify to suit):

#information included to fix reverse proxying
#https://doc.owncloud.org/server/8.2/admin_manual/configuration_server/reverse_proxy_configuration.html
‘trusted_proxies’ => [‘0.0.0.0’],
‘overwritehost’ => ‘www.warbel.net’,
‘overwriteprotocol’ => ‘https’,
‘overwritewebroot’ => ‘/owncloud’,
‘overwritecondaddr’ => ‘^00\.0\.0\.0$’,

Then enable https rewriting in the /var/www/owncloud/.htaccess file. Owncloud is smart enough to know when its being accessed via proxy.
Change Edit:  RewriteCond %{HTTPS} off
to  RewriteCond %{HTTPS} on

Just to be safe, unload ssl and restart apache2.
sudo a2dismod ssl; sudo service apache2 restart

Test that ssl is disabled. I discovered that I needed to clear my cache/history, as Chrome would attempt to redirect to https as per my broswer history.

I have another server that handles Deluge and Sonar. I won’t go into depth here, but if you want those applications to be accessible via a reverse proxy then stop the programs and edit their configs. In Sonarr:

Edit the config for Sonarr, /home/<user>/.config/Nzbdrone/config.xml
Edit the line <UrlBase></UrlBase> to
<UrlBase>/sonarr</UrlBase>

In Deluge, edit the conf file: /home/<user>/.config/web.conf edit the line:
“base”: “/” to
“base”: “/deluge”

Start your services again and check they’re functional.

Now the fun part. (This should work, assuming you have letsencrypt already enabled). Enable the proxy modules in apache2:
sudo a2enmod proxy proxy_html proxy_connect; sudo service apache2 restart

Edit your main site’s ssl config in /etc/apache2/sites-enabled/sitename-ssl.config to include the following (again, edit to suit):

ProxyRequests Off
ProxyPreserveHost On

<Proxy *>
Order deny,allow
Allow from all
</Proxy>

ProxyPass /sonarr http://ipaddress:8989/sonarr
ProxyPassReverse /sonarr http://ipaddress:8989/sonarr

#Location directive included to stop unauthorised access to sonarr
<Location /sonarr>
AuthType Basic
AuthName “Sonarr System”
AuthBasicProvider file
AuthUserFile “/etc/apache2/htpasswd”
Require valid-user
</Location>
ProxyPass /deluge http://ipaddress:8112/
ProxyPassReverse /deluge http://ipaddress:8112/

ProxyPass /roundcube/ http://ipaddress/roundcube/
ProxyPassReverse /roundcube/ http://ipaddress/roundcube/
Redirect permanent /roundcube /roundcube/
ProxyPass /postfixadmin http://ipaddress/postfixadmin
ProxyPassReverse /postfixadmin http://ipaddress/postfixadmin

ProxyPass /owncloud/ http://ipaddress/owncloud/
ProxyPassReverse /owncloud/ http://ipaddress/owncloud/
Redirect permanent /owncloud /owncloud/index.php

A few notes on the directives:

  • As Sonarr does not have authentication, I’ve used some resources to make it secure: If necessary, generate a strong random password for apache htaccess file here: http://passwordsgenerator.net/ And use this tool to create your htaccess file contents: http://www.htaccesstools.com/htpasswd-generator/
  • The redirect permanent is useful is people try to access /roundcube, which won’t work, rather than /roundcube/ which will.

At this point you should be able restart everything and it will work (at least it did for me!). Please leave any questions or comments below.

Edit: You may want to stop people inside the network, depending on your dns etc requirements from accessing the mail server on port 80. If so, the following line in your firewall should do the trick, give or take:
$IPTABLES -A INPUT -p tcp –dport 80 ! -s ip.of.www.proxy -j DROP

Summarising the Process

The goal of this project, to some extent, has been to create an environment that functions similarly to a Microsoft exchange +OWA environment using only open-source programs and in a linux environment. The solution had to be robust and scalable and similar to what a small to medium business would use. For the most part I’ve achieved that, however I’ll admit that at this point the lack of a backup solution is a concern. But we’ll put that aside for the time being (due to financial constraints).

I would expect that most end users would be able to adopt the software quickly and integrate it into their workflows. My project would cover most of the basic functions of an office environment, however clearly does not aim to replace or integrate with other software such as HP TRIM, Docushare, Objective etc. Furthermore as far as I’m aware my environment would not be able to support the integration of those programs into the mail server. I digress.

To recap: I’ve been able to create a postfix/dovecot IMAP mail server, secured with SSL. The web interface allows password on the MYSQL backend to be reset by the user. Shared calendar functions are supported by Own Cloud which also supports file sharing and limited online editing of documents. Again, all secured by true SSL thanks to let’s encrypt.

The backend also has web hosting capabilities and useful user management and administration functions. PhpMyAdmin (locked down to the local subnet), PostFixAdmin, the aforementioned Own Cloud are all installed and offer reasonable admin functions similar to to an exchange/AD environment. Any L1 technician would be able to use the backends without too much hassle.

So the final stage will be to setup two more things.

  1. Mailman or similar: PostFixAdmin handles mail aliases well (I would say they’re easier to create than Office365 with ADFS integration) however distribution groups are not supported.
  2. Setting up apache on the web server to handle all incoming requests to the mail server by using the proxy modules. The picture below should demonstrate:

mail-and-web-proxy-diagram

Fundamentally, the web server will encrypt all the incoming traffic or push clients to SSL connections. It will map the following from the mail server:

  • http://mail.warbel.net/owncloud to https://www.warbel.net/owncloud
  • http://mail.warbel.net/roundcube to https://www.warbel.net/roundcube
  • http://mail.warbel.net/postfixadmin to https://www.warbel.net/postfixadmin

The traffice between the mail server and the www server will technically be unencrypted. Given that they’re both VMs running on the same host though, this presents a limited security hole. The mail server will also be configured to firewall off all incoming connections on port 80 and 443 that are not coming from the web server.

Next Step: Reverse Proxy with Apache2

So my next challenge which has so far been a difficult one, is to set up apache 2 as a reverse proxy. The technical challenge is that my mail server sits behind a firewall on a private network. Technically, so does my web-server. All web traffic (read http/https-80/443) is currently forwarded to my web server. It hosts two websites: blog.warbel.net and www.warbel.net – both with SSL enabled.

My mail server also runs apache and is secured in a similar fashion – all requests on port 80 are forwarded to port 443. It has a valid SSL certificate for mail.warbel.net.

To demonstrate the challenge, I have unashamedly borrowed this graphic from Atlassian:

reverseproxy

In their example they have three internal servers with the reverse proxy in the middle, accessing the services on the private network on behalf of the client. In my scenario, the reverse proxy is also a web server in its own right, and only needs to forward SSL requests to the mail server. There are, on the web server, only two URLs that are important. https://mail.warbel.net/roundcube and https://mail.warbel.net/postfixadmin/. I would prefer that I keep the hostname mail.warbel.net intact however as a last resort, proxying the two URLs would work just as well.

Looking ahead, I can see that setting up proxying to just the sub directories will result in SSL errors – apache on mail is configured with only mail.warbel.net as the registered domain name. However I’m yet to figure out how to use apache on the web server to simply forward ssl requests to mail, rather than try and negotiate them itself.

SSL Success – How to enable SSL Certificates with Let’s Encrypt

Having created my blog on my VM host and my mail server on a VM, I decided to move my hosting services to a VM. The process was largely smooth and involved setting up and securing PHP myadmin on my new VM first, then setting up zabbix and finally, transferring all the configs and databases to the new system. The last stage was simply me disabling and removing apache.

Having successfully completed the migration and re-configured port forwarding on my router I now have a web server without SSL. Enabling good SSL is now quite easy (and free). There are only a few steps neccessary as the process is largely automatic. On Ubuntu install letsencrypt from the repo:

sudo apt-get install python-letsencrypt-apache

Then generate the certs:

sudo letsencrypt certonly –webroot -w /var/www/html -d mail.warbel.net
(In the above example I’m working on the mail server, however the same process was true for my web server)

Then enable let’s encrypt on apache:

sudo letsencrypt run –apache –redirect
(This forces apache to use SSL everywhere)

It’s worth explaining that letsencrypt will generate new conf files from your currently active conf files (it will look at /etc/apache2/sites-enabled) and then make new ssl enabled conf files. It will then redirect all http traffic to https.

Add the below line to root’s crontab:

0 5,17 * * * letsencrypt renew >/dev/null 2>&1

This will run letsencrypt every day at 5am and 5pm to check that the certificate is valid. To edit crontab as root use the command:

sudo crontab -e

At this point, restart apache (sudo service apache2 restart) will then work with SSL only.

A final note/step on my mail server: I had attempted to set up postfix and dovecot with the new ssl certificates. Dovecot was easy enough to configure. I edited the /etc/dovecot/conf.d/10-ssl.conf file – specifically, setting the following options to:

ssl_cert = </etc/letsencrypt/live/mail.warbel.net/fullchain.pem
ssl_key = </etc/letsencrypt/live/mail.warbel.net/privkey.pem

Note that the latest ssl certificate and keys will be placed into the ‘live’ folder.

I was as yet, unable to configure Postfix with the new SSL certificates using a similar method. It is still using the snake-oil certificates. This however is only an issue when setting up a mail account for the first time on a PC or device and the work around is easy enough – force the client to accept the certificates. More importantly when accessing the webmail the client is faced with a green/happy padlock indicating that the site is secure, rather than a dire warning of a security breech.

Next Project – Enabling SSL

So my current project has been to setup a mail server and I think I’ve been largely successful in that goal.

My next step (for those interested) will be to enable true ssl with signed certificates. The other issue I have revolves around fact that my website’s subdomains mail and blog are hosted on a virtual machine, mail.warbel.net, whereas www.warbel.net is hosted on the VM host itself (atlas). The trick will be to enable the webserver on atlas to operate as a reverse proxy that will automatically accept all incoming port 443 and 80 connections then forward them, or accept traffic to the appropriate sub-domain.

There are free signed certificate sites available, namely https://letsencrypt.org/ which I will use to achieve these ends.

Enabling User-Initiated Password Resets with Roundcube on Ubuntu 16.04

Another key problem I’ve encountered on my journey to making a fully-featured mail server is that it is currently impossible for end-users to set their own passwords.

If you’ve followed along. You’ll know that I’ve followed this blog on how to setup a mail server. Please also look at the previous posts that I’ve written that outline how to setup phpmyadmin, or set it up yourself to make things a little easier.

Again, after some googling, I found some instructions that guided me how to allow users to change their own passwords, and modified them to suit.

Firstly, edit /etc/roundcube/config.inc.php
Find the line: $rcmail_config[‘plugins’] = array(‘managesieve’); and change it to:
$rcmail_config[‘plugins’] = array(‘managesieve’,’password’,);
Thus enabling the password plugin. If you restart the apache service (probably not necessary) and log into roundcube, the option to reset your password will be under settings under the password tab.

Next we need to give access to the plugin to the right elevated credentials on the database and give it the right SQL query to use. In order to limit the damage that a malicious person might inflict I’ve decided to make a new user on the database with limited access to ONLY the mailbox/user database and only the power to change password of the single user currently logged in.

Creating a user can be done via phpmyadmin, or if you’ve come this far, by doing it at the command line.

The key point here is to only allow access to the user (mailbox) table in the database. Again, this can be done by using phpmyadmin or if you’re in a hurry by using the the SQL query:

GRANT SELECT (`username`), UPDATE (`password`) ON `mail`.`mailbox` TO ‘THEUSERNAME’@’localhost’;

Next, we need to edit the settings in /etc/roundcube/plugins/password/config.inc.php.

The file is originally empty, so place inside the php brackets:

$config[‘password_driver’] = ‘sql’;
$config[‘password_confirm_current’] = true;
$config[‘password_minimum_length’] = 8;
$config[‘password_require_nonalpha’] = true;
$config[‘password_log’] = false;
$config[‘password_login_exceptions’] = null;
$config[‘password_hosts’] = array(‘localhost’);
$config[‘password_force_save’] = true;
$config[‘password_algorithm’] = ‘md5-crypt’;
// SQL Driver options
$config[‘password_db_dsn’] = ‘mysql://USER:PASSWORD@localhost/mail’;

// SQL Update Query
$config[‘password_query’] = ‘UPDATE mailbox SET password=%P WHERE mailbox.username=%u LIMIT 1’;

And thats it! If you have phpadmin, I suggest you keep a record of the original hashed password of your test user so you can then repair any damage you might do while troubleshooting.

Install OwnCloud on Ubuntu Server 16.04 with a Mail Server

Setting up a mail server is covered in a previous post…

Before starting I have created a copy of my VM to mitigate breaking everything and I recommend you do too, if you’re reading this.

I have a unique installation – phpmyadmin is running on another server and I would like to enable access to the mysql server running on the mail server.

On the mail server I commented out:
bind-address           = 127.0.0.1
from the file /etc/mysql/mysql.conf.d/mysqld.cnf

Then, also on the mail server entered the commands:
$ mysql -u root -h localhost -p
CREATE USER ‘myusername’@’localhost’ IDENTIFIED BY ‘mypassword’;
GRANT ALL PRIVILEGES ON *.* TO ‘myusername’@’localhost’ WITH GRANT OPTION;
CREATE USER ‘myusername’@’%’ IDENTIFIED BY ‘mypassword’;
GRANT ALL PRIVILEGES ON *.* TO ‘myusername’@’%’ WITH GRANT OPTION;
exit

This created a new user with ‘myusernam’ and ‘mypassword’ that has remote access to the entire mysql installation.

Back on the server, I edited the phpmyadmin config file /etc/phpmyadmin/config.inc.php and appended the following to the file (after backing up of course!):

$i++;
$cfg[‘Servers’][$i][‘verbose’] = ‘Mail’;
$cfg[‘Servers’][$i][‘host’] = ‘mail.myhostname.net’;
$cfg[‘Servers’][$i][‘port’] = ”;
$cfg[‘Servers’][$i][‘socket’] = ”;
$cfg[‘Servers’][$i][‘connect_type’] = ‘tcp’;
$cfg[‘Servers’][$i][‘extension’] = ‘mysqli’;
$cfg[‘Servers’][$i][‘auth_type’] = ‘cookie’;
$cfg[‘Servers’][$i][‘AllowNoPassword’] = false;

Then restarted the apache service on the server where phpmyadmin is running and voila! I can log into the remote mysql installation.
From there it was a simple matter of creating a new user for ownlcloud. To do that I have been following the instructions I’ve found here and install instructions for Ubuntu 16.04 here.

To secure my installation and stop passwords from being sent in the clear, I forced ssl connections in owncloud. Googled and found instructions here.
In short, edit the file /var/www/owncloud/.htaccess
In the section <IfModule mod_rewrite.c> add two lines below ReWriteEngine on:
RewriteCond %{HTTPS} off
RewriteRule (.*) https://%{HTTP_HOST}%{REQUEST_URI}

Restart apache and it should force you to use the https rather than http access.

Configuration is not covered here. However you should be able to log in and continue.

Next Steps

Having finally enabled filtering and tested my server from both an exchange and google account, I realised it’s time to move on the fact that my email server does not have calendar functions. Given that this is built into exchange is disappointing realisation.

As such I’ve done some research and testing this week. I found that I needed to install a calDAV server then integrate that with plugins to roundcube. There are however many groupware solutions available.

I tried Horde first and found a great package/installer here. After installing it I was underwhelmed to be perfectly honest. I also don’t like the installing pre-configured appliances/VMs as it defeats the primary purpose of setting it up – learning something new.

I moved on and I am now attempting to install and configure owncloud. Owncloud has been in the back of my mind for sometime now. Frankly I’m happy with the combination of plex, dropbox, RDS and shell/sftp access that I have to my files and media already so didn’t feel the need to add yet another access method. However, given that owncloud now has a webmail client as well as groupware functionality I’ll give it a go.

Enabling Filtering with Dovecot and Roundcube

After establishing my new mail server I wanted to enable a critical component: mail filtering. I also wanted to test the spam filters to see if they actually worked!

Spam filtering was easy. Using this resource, I sent an email to myself from gmail while monitoring the system logs with:

root@mail:/var/log# watch -n .5 tail -50 syslog

This is the critical line to show that the spam was blocked:

mail amavis[18399]: (18399-06) Blocked SPAM {DiscardedInbound,Quarantined}, [209.85.217.170]:36018 [209.85.217.170] <xxxxxxx@gmail.com> -> <warren@warbel.net>, quarantine: z/spam-z0c8jTW67Lm4.gz, Queue-ID: 6E6E1429C4, Message-ID: <CADwHEq4-8TcFwpPmVw8V2hDWTXHd4jNBP2JAPsvPuG_KgmKEPg@mail.gmail.com>, mail_id: z0c8jTW67Lm4, Hits: 999.9, size: 2180, dkim_sd=20120113:gmail.com, 4444 ms

The mail did not appear in my spam folder.

The second challenge was to enable custom rules. I wanted this mainly to deal with the alerts I was getting from Zabbix. There is a significant amount written about this issue online. I have found the following resources useful, however incomplete. They do not apply to Ubuntu 16.04 as far as I can see.
Link 1
Link 2
Link 3
Link 4
And when, after trying to comprehend and implement all these ideas, resorted to troubleshooting where I found this useful:

Link 5

The critical step that is missed in the above is that sieve must be enabled in /etc/dovecot/15-lda.conf. Where LDA stands for Local Delivery Agent, which is where we want filtering.

The code is:

protocol lda {
# Space separated list of plugins to load (default is global mail_plugins).
mail_plugins = $mail_plugins sieve
}

Again, watching the system logs and after recreating a rule, and testing it, could see managesieve apply the rules.


Creating Zabbix Alerts

Now that I have a fully fledged mail server, I created email alerts so I know when my servers go offline or have other problems that may need my attention.

It took some troubleshooting to get Zabbix’s settings correct as my mail server will only accept SSL/TLS mail from users. Furthermore it has self signed certificates.

In the end the working configuration was:

screenshot-from-2016-10-02-17-24-36